Computer Hardware Installing computer memory Before getting started 1. Turn off your computer. 2. Unplug it. 3. Ground yourself or wear an antistatic wrist strap. 4. Remove the case. Locate memory slots and install memory Once the memory has been purchased locate the memory banks on the computer motherboard.
If no memory banks are available on the computer memory must be removed
before the memory can be installed. Note: When handling the memory, hold it by each end of the module, be careful not to bend it, flex it or drop it while handling it. When pushing the memory into the computer do not apply an excessive amount of pressure, doing this could cause damage to the memory module as well as the slots on the motherboard. Finally, when installing the memory distribute the pressure evenly by pressing on both corners of the memory module. SIMM memory installation steps 30 and 72-Pin SIMM memory modules must occupy a bank. Computer's which use 72-Pin
SIMM's generally have two sockets as one bank therefore two memory modules of
equal value must be installed in pairs, unless instructed otherwise by the computer
or motherboard manufacturer. Generally the installation of most SIMM memory is the same. The memory must be entered at an angle, generally about a 75-degree angle and while still in the memory slot moved to a vertical or 90-degree angle. As the memory module is moved to a vertical position it should snap into place. When installed ensure that both sides of the memory module are snapped into place. If a memory module is not installed properly or not all the way in this could cause damage or the computer Generally it is recommended that the larger memory modules be installed in the lowest available banks. For example, you computer may have a pair of 2 4MB memory modules and you are installing 2 32MB memory modules, therefore you may want to consider installing the 2 32MB memory modules into bank 0 and 1 / 1 and 2. Note: Some computer manufacturers may require that different types of SIMM modules be installed in a certain order, therefore if your new computer memory installation does not work consider switching the location of the memory. DIMM (DRAM / SDRAM / DDR) memory installation steps The installation of DIMM memory when compared to SIMM is generally a much easier
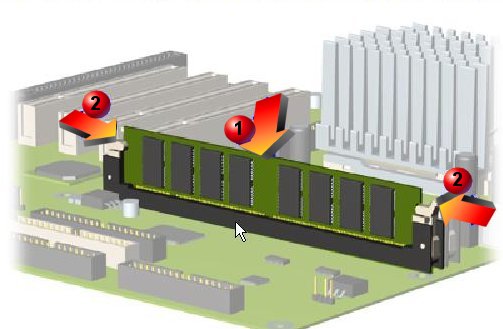
installation. Each slot on a motherboard that supports a DIMM is a bank therefore
the computer will work if just one memory module is purchased. DIMM memory is installed at a vertical or 90-degree angle (#1 in the picture below). However, before installing the memory the DIMM slot will likely have two tabs on both sides of the slot. These tabs must be moved out or away from the slot itself. Once these tabs have been moved out push the DIMM memory module in at a vertical or 90 degree angle, as the memory module is being pushed the two tabs should snap and hold the memory module into place (#2 in the picture below). RIMM memory installation steps What makes RIMM memory modules different from DIMM memory modules is the C-RIMM memory
module. This module helps allow the computer to have a continuous flow of
data. When installing a new RIMM you will likely have to remove this module. This
module is a small circuit board and generally has a few or no chips on it.
Once the C-RIMM module has been removed and the two tabs are in the outwards position, push the RIMM memory module in at a vertical or 90 degree angle, as the memory module is being pushed the two tabs should snap and hold the memory module into place. Installing notebook memory Before the memory can be installed into a notebook the memory slots must be located. If you are unfamiliar with where these slots are located below is a listing of possible locations: 1. On a compartment on the bottom of the laptop. 2. Under the keyboard. 3. Within the computer. If you are unable to locate the slots after looking at each of the above recommendations, I recommended you contact the computer manufacturer for additional help / information. Once the slots have been located the next step will be to install the computer memory. Today most laptops follow the same memory installation: Because laptops are thin when compared to a desktop computer the memory banks are horizontal with the laptop. The memory must be inserted at an angle, generally about a 75-degree angle and once in the slot press down on the memory to snap the memory into place. The memory should also lay horizontal with the computer. Set memory in BIOS Once the memory appears to have been successfully installed into the computer place
the case back onto the computer and connect the keyboard, monitor and power
to the computer (I recommend that you do not connect all the cables yet, if problems
are experienced you may have to disconnect all the cables again). Turn on
your system. It may automatically boot into the CMOS screen, and the BIOS will
automatically recognize the new memory. You have to exit the CMOS screen for the
settings to take effect, and your computer might then reboot. If you get an
error message, bring up the CMOS screen, and the BIOS will automatically recognize
the new memory. Exit the screen and save the CMOS settings for them to take
effect. That's it. |


Back To Computer Hardware & MS-DOS Information Main Page |