
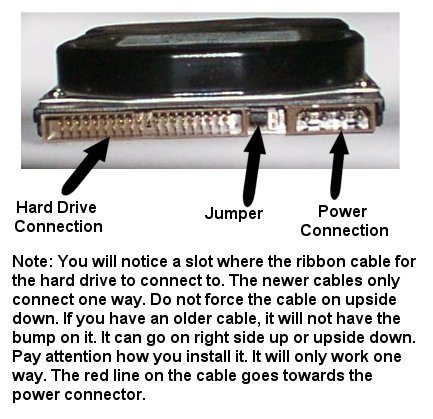
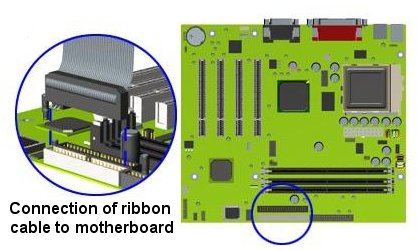
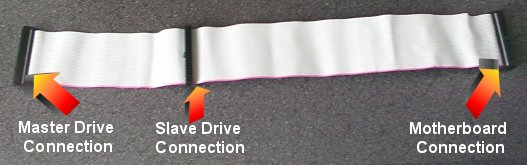
Computer Information How To Install a Hard Drive Step #1 Select a new hard drive. Unless you really need to replace a poorly performing drive, it's easier to add a second drive. When choosing a new hard drive, look for both capacity--get the biggest one you can afford--and performance. Generally speaking, a hard drive with a faster rotation speed will perform better. Currently, there are 5400rpm drives and 7200rpm drives out on the market. The newer 7200rpm drives are much more efficient and transfer data faster. They may cost a little more, but worth it for the increase in speed. You'll also need to make sure that the drive you choose fits an open drive bay. Hard drives come in 3.5-inch and 5.25-inch sizes. Most standard drives now mainly come in the 3.5-inch size. Finally, make sure you have any extras such as mounting rails and a ribbon cable that supports two drives. This hardware normally comes with a new hard drive. A "bare" drive comes only with the drive. No mounting hardware is included. NOTE: Check your computer before you buy a new hard drive that you intend to use as a slave drive!! I've worked on alot of older computers that only have only one mounting spot for a hard drive! Step #2 Prep your system. Back up your hard drive to removable media. If you use Windows 95 or Windows 98, make a bootable floppy disk (See Windows 98 Page - Create a Windows Boot Disk or the Windows XP Page - Create A Startup Disk). Finally, go to the CMOS screen (normally accessed by pressing the delete key when the system boots or starts up) and write down all the information on the BIOS settings for your current hard drive. Step #3 Configure the drive. Do this step before mounting the drive or connecting any cables. If you don't you may find it difficult to reach the jumpers and occasionally the jumper setting diagram is located on top of the drive. If you keep your existing hard drive (master), you'll set the new one to be slave by setting the jumpers on the back of the hard drive according to the documentation. A jumper is a little plastic and metal shunt that normally covers two pins to close a connection. Because your new hard drive is faster and bigger than your old hard drive, you can also switch between the two by changing the jumper settings. Step #4 Install the drive. Turn off your PC, open the case, and ground yourself (either with an anti static wrist strap or by touching the power supply). Slide the new drive into the bay or onto the mounting brackets. Then screw the drive firmly into place. Step #5 Connect the drive ribbon cable. The ribbon cable runs from your controller (motherboard) to your hard drive. If there is no free connector on the cable, you have to buy a new one. Connect the ribbon cable connector to the 40-pin slot on the hard drive. The ribbon cable has a stripe on one side of it, indicating which side of the cable plugs into pin one (located closest to the power supply connector) on the hard drive. The cable has three connections on it. The one that has the most cable from the two closest connections is the end that plugs into the motherboard. The newer cables have a blue connector that plugs into the motherboard. The other end has two connections. The farthest one out is where the primary drive or master drive (the drive that will be the C:\ drive and normally contains the operating system files) connects. The other one is where the secondary drive connects or slave drive (the drive that will be the D:\ drive) connects. Hard Drive Ribbon Cable Motherboard Connection Hard Drive Connections Step #6 Connect the power. The power-supply cable has a connector on the end of it--usually four sockets encased in a small sheath of white plastic. Plug that into the connector on your hard drive. It will only plug in one way. Step #7 Final Connections. Close the case and connect all the cables to your computer. Start the computer. NOTE: You may want to wait to close the case and connect all cables (except the mouse, keyboard, power cable, and monitor) until you are sure the drive is detected. If any cables are loose you will have to open it up again. Step #8 Change or check the CMOS settings. Refer to your motherboard manual on setting up the CMOS for detecting hard drives. Normally, the newer motherboards will automatically detect it on startup. Step #9 Format the drive. If you don't format your drive, you won't be able to use it. If you have installed it as a slave drive, you will see it listed in My Computer. However, you will not be able to store information on it until you format it. For the easiest method to format a slave drive in Windows see General Information - Format A Drive in Windows. To format a drive in MS-DOS (master drive will need to be done this way) see General Information - Set Up and Partition A Hard Drive. |

Back To Computer Hardware & MS-DOS Information Main Page |